Throughout this article we will create a fairly basic integration between Statamic 3 and the newly updated Laravel Spark. This guide will be using Spark's Stripe option, but if you want to use Paddle, the overall steps should not be too different. There will be quite a few moving pieces in this article, and it assumes the following is true:
- You have a PHP environment setup that can run new Statamic 3 projects,
- You already have a Laravel Spark license and access to the documentation,
- You are comfortable with the
artisanandpleasecommand line utilities, - You have a Stripe account, and can make changes to that account's test data,
- You have access to a database server (such as MySQL, Postgres, etc.)
Throughout this guide, we will be working with the Cool Writings Statamic Starter Kit. We will also make use of Expose to make our development site publicly available to interact with Stripe's web hooks later on. Before continuing along with the rest of this article, make sure you have a new Statamic 3 site available (based on the Cool Writings Starter Kit), and have installed and configured Expose on that project. The Expose installation documentation can be found at https://beyondco.de/docs/expose/getting-started/installation.
#A Slight Tailwind CSS Detour
Tailwind CSS has been configured as part of the Statamic Cool Writings Starter Kit. We are going to make a quick change to the tailwind.config.js file at the root of your new project. At the top of the file add this line:
1const colors = require('tailwindcss/defaultTheme').colors;Search for the colors property within theme and adjust it so it looks like this:
1colors: { 2 ...colors, 3 transparent: 'transparent', 4 black: '#000', 5 white: '#fff', 6 teal: '#008483', 7 'teal-light': '#a6d0cf', 8 gray: { 9 100: '#f7fafc',10 200: '#edf2f7',11 300: '#e2e8f0',12 400: '#cbd5e0',13 500: '#a0aec0',14 600: '#68768a',15 700: '#4a5568',16 800: '#2d3748',17 900: '#1a202c',18 },19},Now run npm run dev to regenerate the site's CSS and JavaScript files. All this change does is get us access to a few more color classes later when building out some Antlers templates.
#Update Your Statamic 3 Site to Use Database Users
For this integration to work, we will need to switch the Statamic 3 site to use the database eloquent driver to store site users. The Statamic 3 Knowledge Base article Storing Users in a Database can be used to update your site's configuration and generate the base database tables.
If you receive errors such as "Base table or view not found: 1146 Table 'password_activations/password_resets' doesn't exist" when using the password reset, or new account activation email features, the Enabling Database Users in Statamic 3 article will assist you in creating the missing database migrations and tables.
Once you have updated your site's configuration, create a new user using the please command line utility:
1php please make:userOnce you've created your new user, verify that you can log into your site's Control Panel using the database configuration.
Make sure to enable Statamic Pro in config/statamic/editions.php before continuing. Statamic Pro is required for sites that have multiple users. You can learn more about Statamic Pro on the Statamic Pricing web page.
To keep things somewhat simple, I will be using two terminal windows to host the development site (instead of Sail, Valet, etc.). In one terminal window I am running:
1php artisan serveWhich produces output similar to this:
1john@computer:/sparktutorial$ php artisan serve2Starting Laravel development server: http://127.0.0.1:80003[Sat Feb 20 19:44:07 2021] PHP 7.4.15 Development Server (http://127.0.0.1:8000) started4[Sat Feb 20 19:44:07 2021] 127.0.0.1:55290 AcceptedIn the second terminal window I issued the following command to have Expose make the site publicly available for later in the tutorial:
1john@computer:/sparktutorial$ expose share http://127.0.0.1:8000Which produces output similar to this:
1Thank you for using Expose!23...45---6Local-URL: 127.0.0.1:80007Dashboard-URL: http://127.0.0.1:40408Expose-URL: https://<SOME_URL>.sharedwithexpose.comWhichever method you use to run your development site, or make it publicly available, just remember the public facing URL so we can use it later when configuring Stripe web hooks. If you decide to also use artisan serve - make sure to not accidentally close those two terminal windows while working.
#Installing Laravel Spark
We will now get our PHP environment prepped for the actual installation of Spark Stripe. Ensure that your PHP environment has the following PHP extensions installed and enabled (you may need to search for specific installation instructions based on your operation system and package manager):
-
soap -
intl
At this point, we will install Laravel Spark so that we can get started with our integration. Follow the Spark installation documentation located at https://spark.laravel.com/docs/1.x/installation.html. Be aware that the documentation's code examples are configured to use Paddle, by default. At the point in the documentation where you are updating the require section of your composer.json file use these values instead:
1"require": {2 "laravel/spark-stripe": "^1.0"3},Your full require section should look similar to this once done:
1"require": { 2 "php": "^7.3 || ^8.0", 3 "doctrine/dbal": "^3.0", 4 "fideloper/proxy": "^4.2", 5 "fruitcake/laravel-cors": "^2.0", 6 "guzzlehttp/guzzle": "^7.0.1", 7 "laravel/framework": "^8.0", 8 "laravel/tinker": "^2.0", 9 "statamic/cms": "3.0.*",10 "statamic/ssg": "dev-master",11 "laravel/spark-stripe": "^1.0"12},Don't forget the steps at the end of the Spark installation where it instructs to run php artisan spark:install and php artisan migrate.
We will pick things back up in the next section after Spark has been installed.
#Updating the User Model
In this section, we will make a few changes to our User model to get ready for future sections. The changes we will be making are:
- Adding the
Spark\Billable\Billabletrait, - Adding the
trial_ends_atcolumn to$fillable, - Adding a date/time cast for the
trial_ends_atcolumn
Locate the app/Models/User.php file and change the contents to:
1<?php 2 3namespace App\Models; 4 5use Illuminate\Contracts\Auth\MustVerifyEmail; 6use Illuminate\Database\Eloquent\Factories\HasFactory; 7use Illuminate\Foundation\Auth\User as Authenticatable; 8use Illuminate\Notifications\Notifiable; 9use Spark\Billable;10 11class User extends Authenticatable12{13 use Billable, HasFactory, Notifiable;14 15 /**16 * The attributes that are mass assignable.17 *18 * @var array19 */20 protected $fillable = [21 'name',22 'email',23 'password',24 'trial_ends_at'25 ];26 27 /**28 * The attributes that should be hidden for arrays.29 *30 * @var array31 */32 protected $hidden = [33 'password',34 'remember_token',35 ];36 37 /**38 * The attributes that should be cast to native types.39 *40 * @var array41 */42 protected $casts = [43 'email_verified_at' => 'datetime',44 'trial_ends_at' => 'datetime',45 ];46 47}#Creating User Registration and Login Pages
Before moving on with more of the Spark integration, let's create a page for users to register for new accounts, and a page for them to login. We will start this by creating two new Antlers templates (they can remain empty for now) at the following locations:
-
resources/views/login.antlers.html -
resources/views/register.antlers.html
From within the Statamic Control Panel, navigate to the Pages collection and select Create Entry. When asked which blueprint to use, select Page. On the create entry page enter Register for the title, and select the register template:
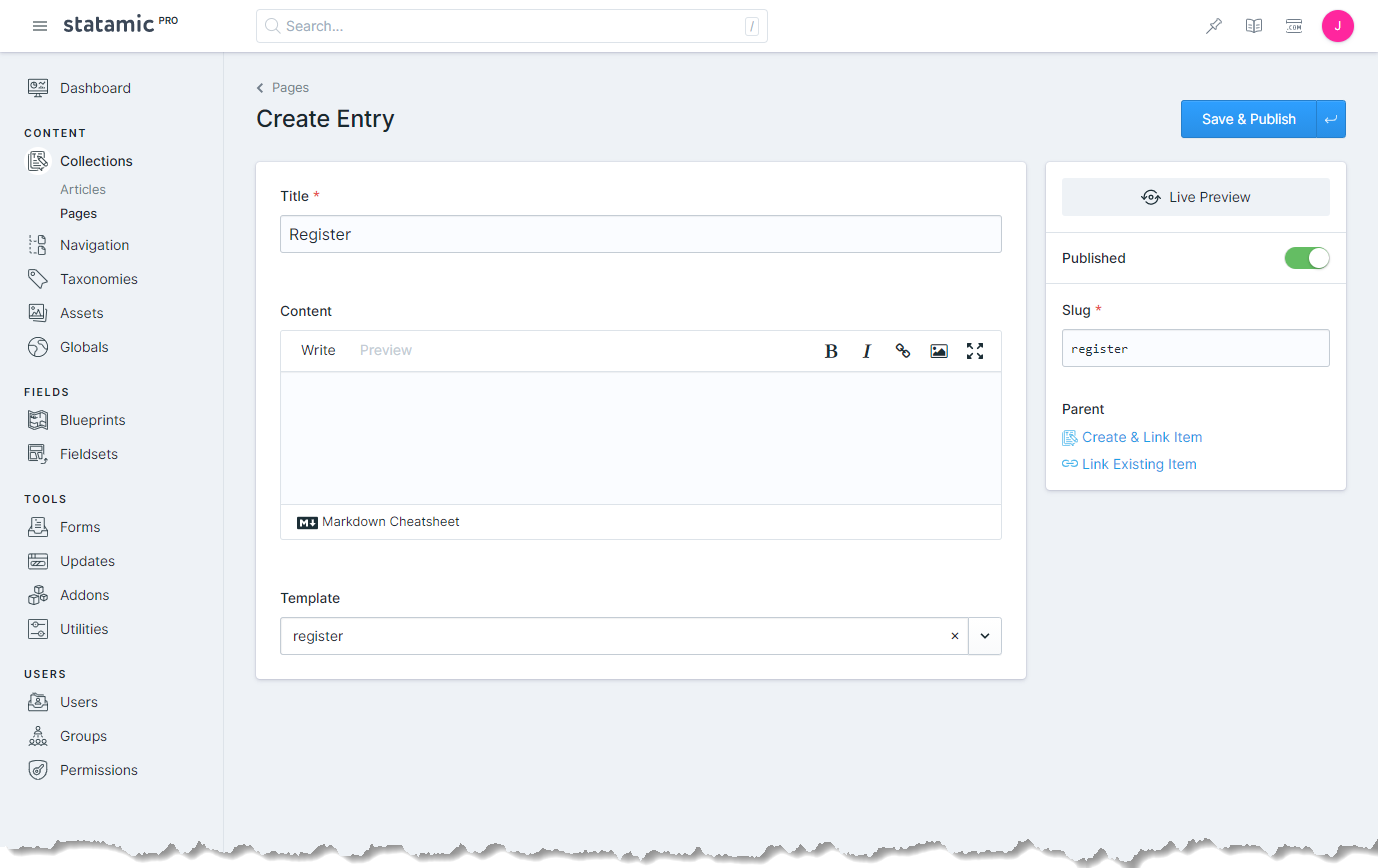
Do this once more, but use Login as the title and select the login template instead.
If you change the title of the login page, pay attention to what the generated slug is. We will need this value in a future step.
The following templates are incredibly opinionated, and not intended to be final products, and only serve to get something on the page so we can continue.
Locate the resources/views/register.antlers.html template and set the content to the following:
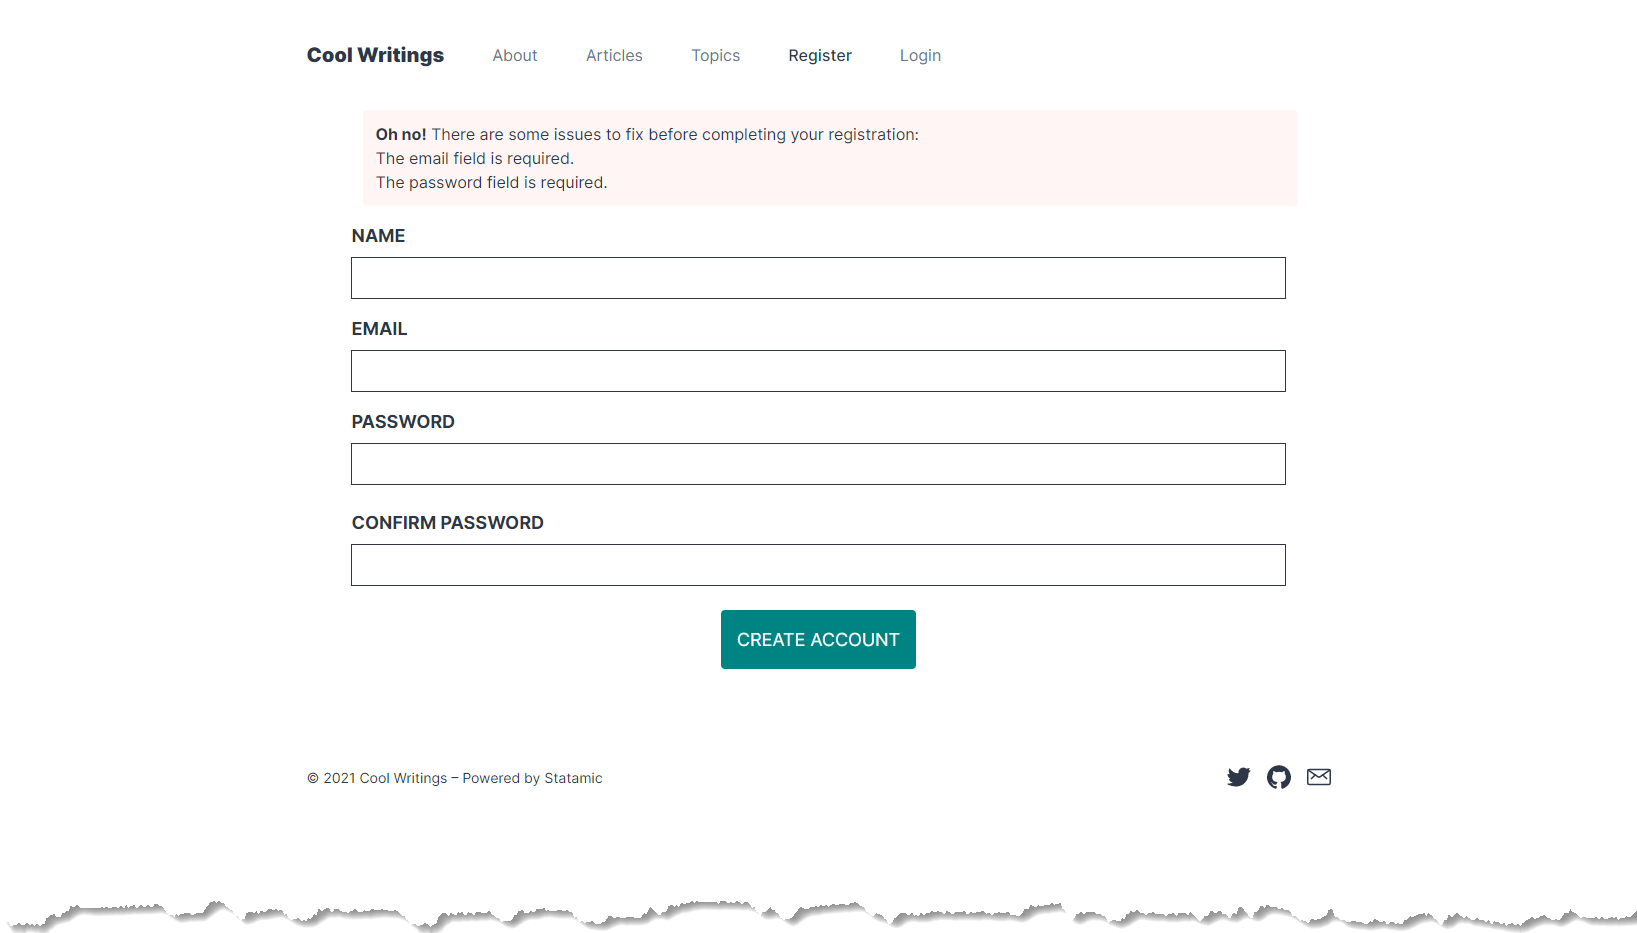
1<div class="flex justify-center"> 2 3 <div class="w-3/5"> 4 {{ user:register_form }} 5 6 {{ if errors }} 7 <div class="w-full mx-3 border-red bg-red-100 mb-4 px-3 py-3 rounded relative" role="alert"> 8 <strong class="font-bold">Oh no!</strong> 9 <span class="block sm:inline">There are some issues to fix before completing your registration:</span>10 11 <ul>12 {{ errors }}13 <li>{{ value }}</li>14 {{ /errors }}15 </ul>16 </div>17 {{ /if }}18 19 {{ if success }}20 <div class="bg-green-300 text-white p-2">21 {{ success }}<br>22 </div>23 {{ /if }}24 25 <div class="flex flex-col mb-4">26 <label class="mb-2 uppercase font-bold text-lg text-grey-darkest" for="name">Name</label>27 <input class="border py-2 px-3 text-grey-darkest" type="text" name="name" id="name" value="{{ old:name }}">28 </div>29 <div class="flex flex-col mb-4">30 <label class="mb-2 uppercase font-bold text-lg text-grey-darkest" for="email">Email</label>31 <input class="border py-2 px-3 text-grey-darkest" type="email" name="email" id="email"32 value="{{ old:email }}">33 </div>34 <div class="flex flex-col mb-6">35 <label class="mb-2 uppercase font-bold text-lg text-grey-darkest" for="password">Password</label>36 <input class="border py-2 px-3 text-grey-darkest" type="password" name="password" id="password">37 </div>38 <div class="flex flex-col mb-6">39 <label class="mb-2 uppercase font-bold text-lg text-grey-darkest" for="password_confirmation">Confirm40 Password</label>41 <input class="border py-2 px-3 text-grey-darkest" type="password" name="password_confirmation"42 id="password">43 </div>44 <button class="block bg-teal hover:bg-teal-dark text-white uppercase text-lg mx-auto p-4 rounded" type="submit">45 Create Account46 </button>47 48 {{ /user:register_form }}49 </div>50 51 52</div>Submitting the form without any input values should produce an output similar to the following:
We will do something similar for the resources/views/login.antlers.html template file:
1<div class="flex justify-center"> 2 3 <div class="w-3/5"> 4 {{ user:login_form }} 5 6 {{ if errors }} 7 <div class="w-full mx-3 border-red bg-red-100 mb-4 px-3 py-3 rounded relative" role="alert"> 8 <ul> 9 {{ errors }}10 <li>{{ value }}</li>11 {{ /errors }}12 </ul>13 </div>14 {{ /if }}15 16 {{ if success }}17 <div class="bg-green-300 text-white p-2">18 {{ success }}<br>19 </div>20 {{ /if }}21 22 <div class="flex flex-col mb-4">23 <label class="mb-2 uppercase font-bold text-lg text-grey-darkest" for="email">Email</label>24 <input class="border py-2 px-3 text-grey-darkest" type="email" name="email" id="email"25 value="{{ old:email }}">26 </div>27 <div class="flex flex-col mb-6">28 <label class="mb-2 uppercase font-bold text-lg text-grey-darkest" for="password">Password</label>29 <input class="border py-2 px-3 text-grey-darkest" type="password" name="password" id="password" value="{{ old:password }}">30 </div>31 <button class="block bg-teal hover:bg-teal-dark text-white uppercase text-lg mx-auto p-4 rounded" type="submit">32 Log in33 </button>34 35 {{ /user:login_form }}36 </div>37 38 39</div>Before going any further, or before creating any site users let's try and access the Spark billing panel. The billing panel is accessible at yoursite.tld/billing. Try to access this page on your project (make sure you are not logged into the Control Panel, either). You should receive an error stating something similar to:
1Route [login] not defined.This is because Laravel will attempt to redirect to that named route anytime an authorization check fails. We can change this to point to our new Statamic Login page by updating the app/Http/Middleware/Authenticate.php file to the following:
1<?php 2 3namespace App\Http\Middleware; 4 5use Illuminate\Auth\Middleware\Authenticate as Middleware; 6 7class Authenticate extends Middleware 8{ 9 /**10 * Get the path the user should be redirected to when they are not authenticated.11 *12 * @param \Illuminate\Http\Request $request13 * @return string|null14 */15 protected function redirectTo($request)16 {17 if (! $request->expectsJson()) {18 return url('login');19 }20 }21}Attempting to access the billing panel should now redirect us to our custom Statamic log in page.
#Improving Our Registration Page
Right now, if a user attempts to register without providing a name they will receive an error. This happens because our users database table has the name column set to non-nullable. We could update our migrations and start over there, instead we will just update our Statamic user blueprint and make the Name field required. This will cause the validation to kick in, and ensure that we get a proper name when registering our new users.
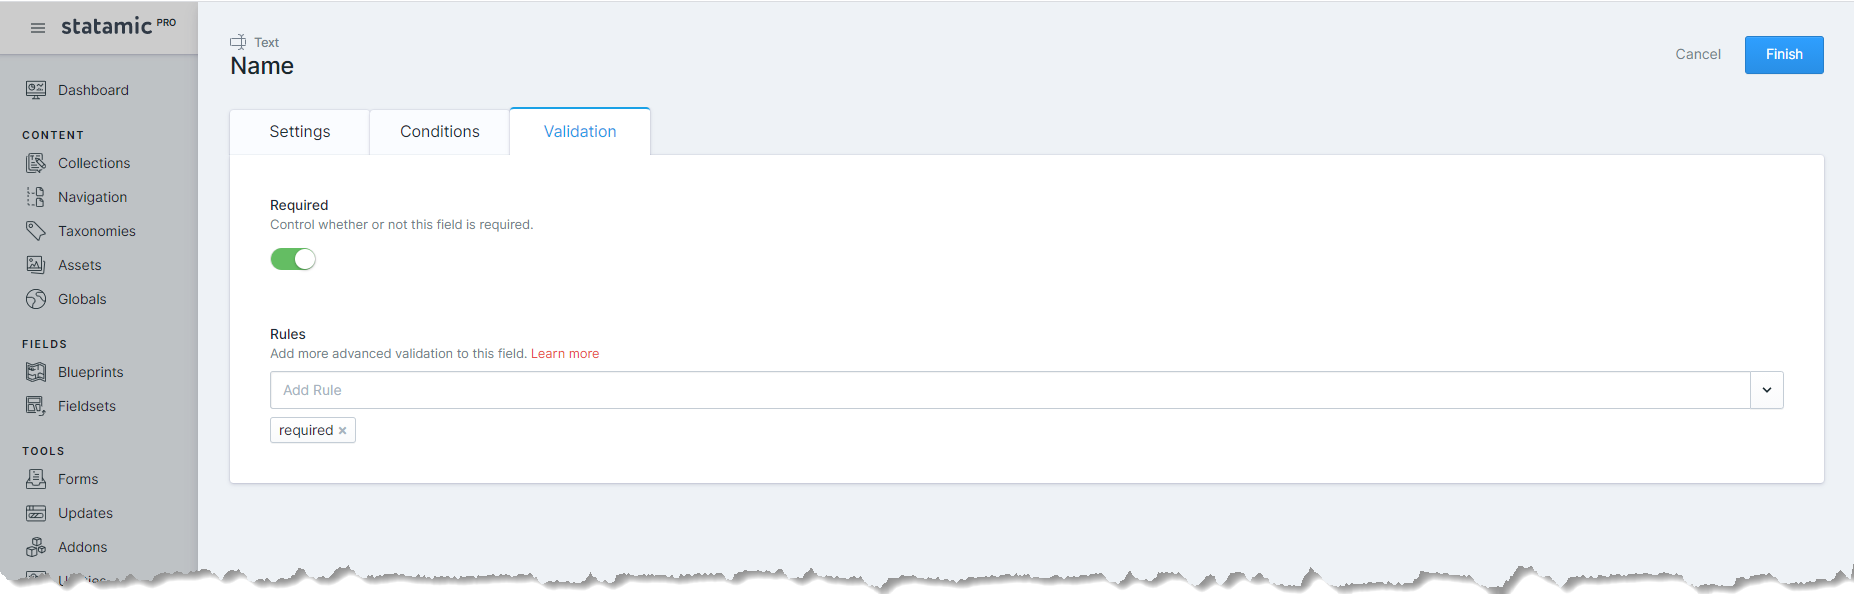
Within the Statamic Control Panel, from the left menu, select "Blueprints". On the page that appears, locate the "User" entry in the "OTHER" section (near the bottom of the list). Click the User entry to bring up the blueprint editor and click the "Name" field.
On the panel that appears, click the "Validation" tab and make the field required. Once done, click "Finish" to close the field panel, and then click "Save" to update the blueprint:
After this change any new attempted registrations that do not provide a name will receive a validation message instead of triggering a database error.
#Improving the Registration and Login Experience
At the moment, when a user has registered they are redirect back to the registration page with a success message. Likewise, when a user logs in, they are redirected to the site's home page. Both of these are fine, but we will update our site so that when a user logs in, or after they have registered, they are redirected to the Spark billing panel.
To do this, we will add a redirect attribute to the existing form tags we created in a previous section.
Locate the resources/views/register.antlers.html template file and update the {{ user:register_form }} tag to this:
1{{ user:register_form redirect="/billing" }}Similarly, locate the resources/views/login.antlers.html template file and update the {{ user:login_form }} tag to this:
1{{ user:login_form redirect="/billing" }}Now, after a user registers or logs in, they will be redirected to the billing panel. Attempting to do this now may raise errors such as No such price - we will take care of this in a later section. Future improvements and enhancements might include redirecting the user to their requested resource (if they have an active billing subscription).
#Improving Our Navigation Menu
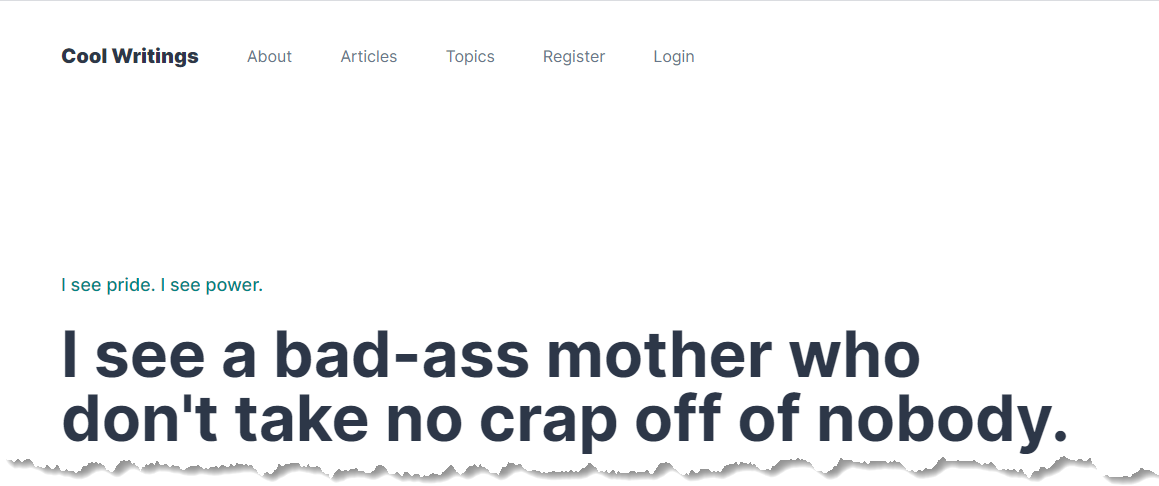
Our current menu looks something like this regardless of if a user is currently signed in or not:
The changes we will make will hide the Registration and Login options when a user is signed in, and add a My Account and Log Out option when they are signed in. Locate the resources/views/_nav.antlers.html template file and update the contents to this:
1<nav class="flex items-center justify-between lg:justify-start flex-wrap py-10 max-w-5xl mx-auto"> 2 <div class="text-md antialiased font-medium"> 3 <a href="/" class="block text-xl lg:inline-block mr-12 font-black">{{ settings:site_name }}</a> 4 </div> 5 <div class="block lg:hidden"> 6 <button class="flex items-center px-3 text-gray-800" x-bind:class="{'hidden': showMobileNav}" @click="showMobileNav = true"> 7 <svg class="fill-current h-5 w-5" viewBox="0 0 20 20" xmlns="http://www.w3.org/2000/svg"> 8 <title>Open Menu</title> 9 <path d="M0 3h20v2H0V3zm0 6h20v2H0V9zm0 6h20v2H0v-2z" />10 </svg>11 </button>12 <button class="items-center px-3 text-gray-800" x-bind:class="{'flex': showMobileNav, 'hidden': ! showMobileNav}" @click="showMobileNav = false" x-cloak>13 <svg class="fill-current h-5 w-5" viewBox="0 0 20 20" xmlns="http://www.w3.org/2000/svg">14 <title>Close Menu</title>15 <path16 d="M10 8.586L2.929 1.515 1.515 2.929 8.586 10l-7.071 7.071 1.414 1.414L10 11.414l7.071 7.071 1.414-1.414L11.414 10l7.071-7.071-1.414-1.414L10 8.586z" />17 </svg>18 </button>19 </div>20 <div class="w-full lg:w-auto lg:flex items-center" @click.away="showMobileNav = false" x-bind:class="{ 'hidden': ! showMobileNav }">21 {{ nav }}22 {{ if logged_in == false or (logged_in and (slug != 'login' and slug != 'register')) }}23 <a href="{{ url }}" class="block {{ is_current || is_parent ?= 'font-medium text-gray-800' }} mt-4 lg:inline-block text-gray-600 hover:text-gray-800 lg:mt-0 mr-12">24 {{ title }}25 </a>26 {{ /if }}27 {{ /nav }}28 29 {{ if logged_in }}30 <a href="/billing" class="block mt-4 lg:inline-block text-gray-600 hover:text-gray-800 lg:mt-0 mr-12">31 My Account32 </a>33 <a href="{{ user:logout_url }}" class="block mt-4 lg:inline-block text-gray-600 hover:text-gray-800 lg:mt-0 mr-12">34 Log Out35 </a>36 {{ /if }}37 </div>38</nav>This change adds a few conditional checks that changes the visibility of our Login and Register pages based on whether the user is logged in or not. Additionally, if the user is logged in, we add two new navigation entries My Account (which links to the Spark billing panel), and the Log Out option (which will log the user out).
#Configuring Stripe and Spark: Creating Our Product
With a few Statamic template adjustments out of the way, let's get to some fun stuff and start configuring Laravel Spark and Stripe. In this section, we will create a new product within the Stripe dashboard with monthly and yearly recurring billing options. After we have created this Stripe product we will then update our project's Spark configuration to use these product and plan identifiers, as well as a number of environment variables so that Stripe can communicate with our website via. web-hooks.
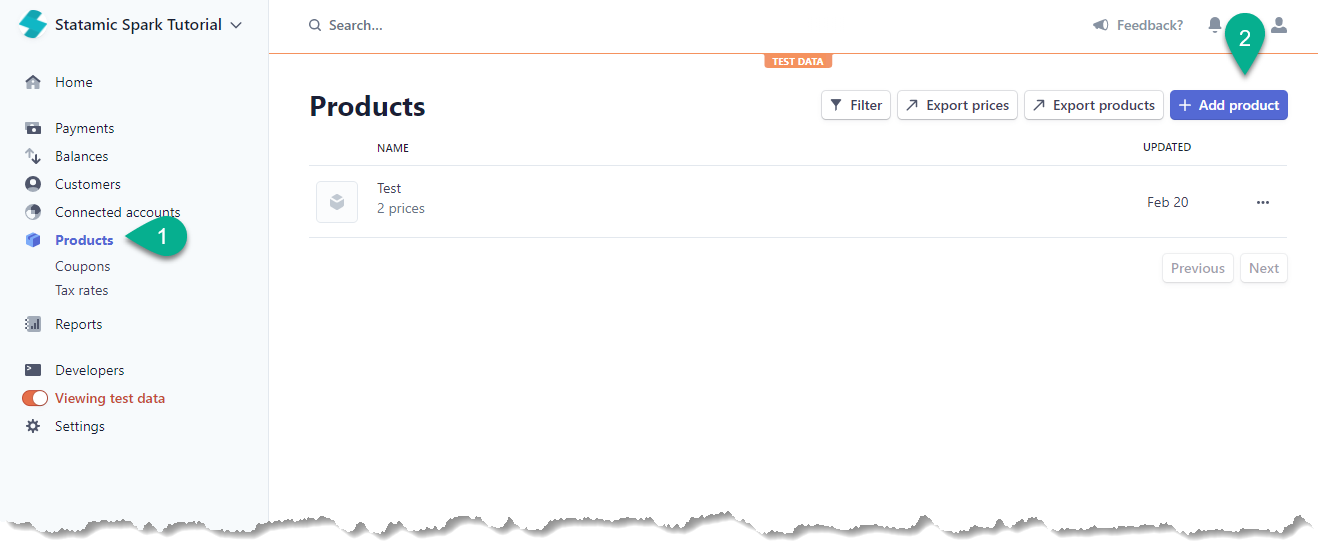
To get started, login to your Stripe account and make sure the "Viewing test data" option in the left menu is enabled. Once your account is in test mode, click the "Products" menu item (labeled 1 in the image below), and then click "Add Product" (labeled 2 in the image below):
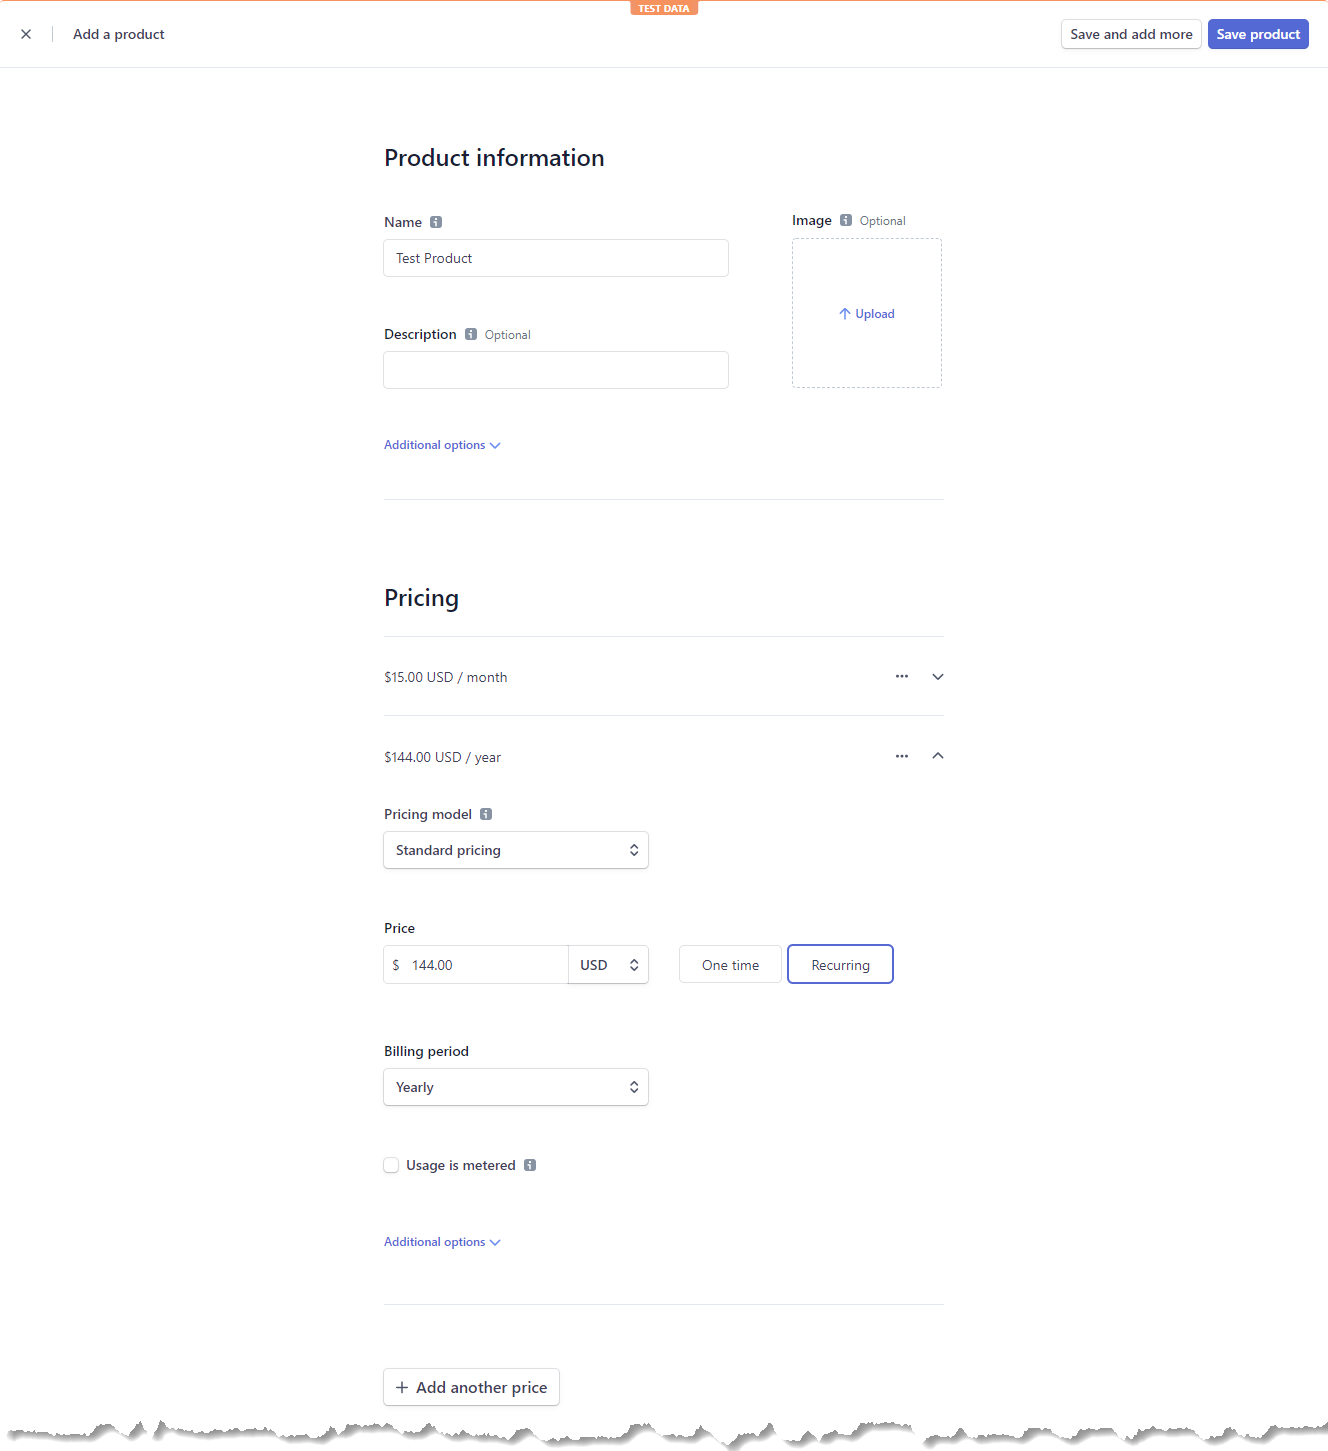
On the page that appears, enter a name for your new product. Towards the middle of the screen, enter a monthly recurring price option, and then click "Add Another Price" to add a new yearly recurring option. For this tutorial I've set the monthly price to 15.00USD and the yearly price to 144.00USD:
Once your new product has been configured the way you want click the "Save product" option in the top right corner to create your new Stripe product.
#Configuring Strip and Spark: Stripe API Keys
Do not share your own API key values on the Internet like this. These are just example values!
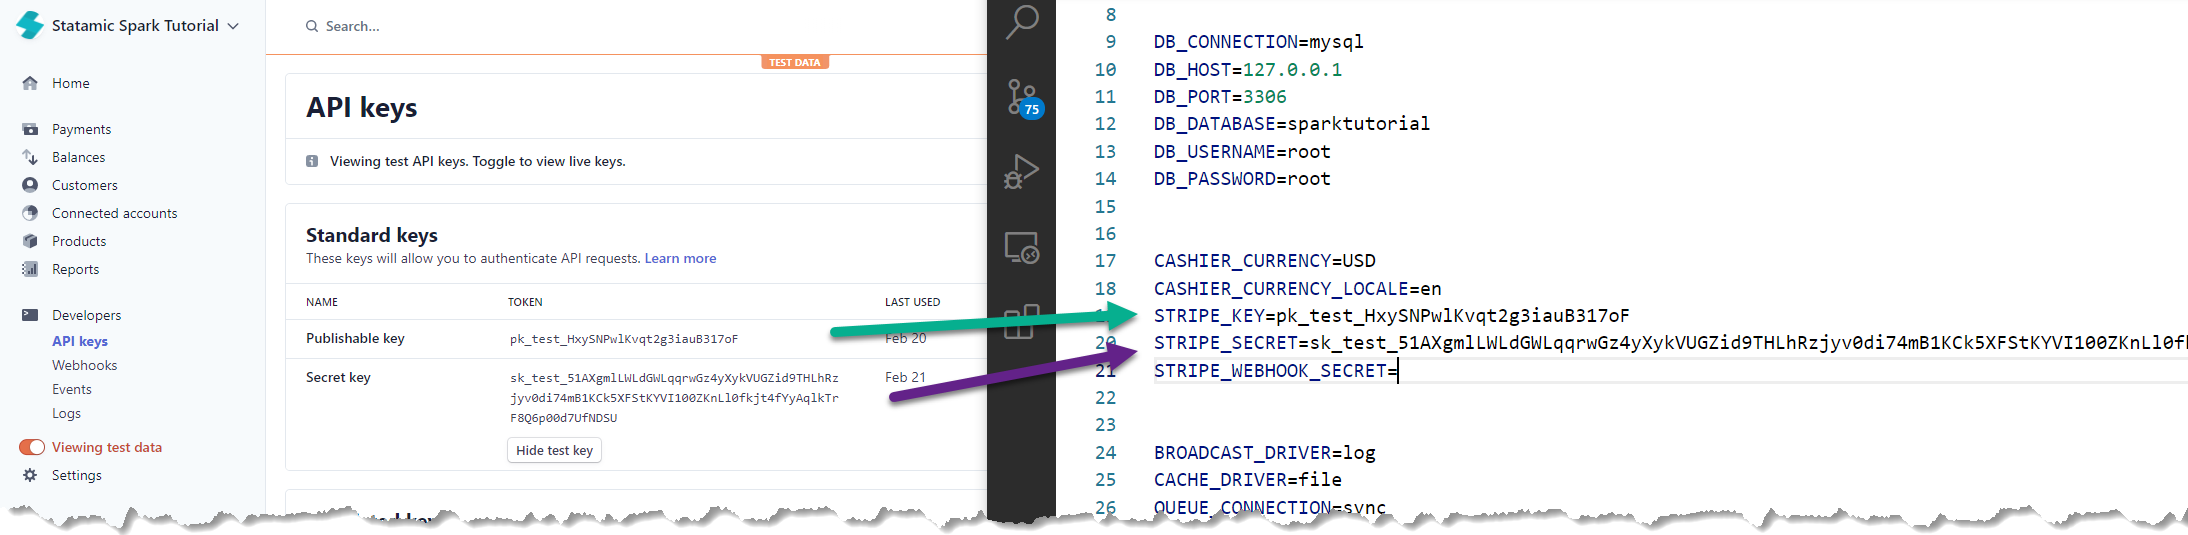
We will now configure the Stripe API keys required for our integration. The Spark documentation for this step can be located at https://spark.laravel.com/docs/1.x/spark-stripe/configuration.html#environment-variables. Within the Stripe dashboard, select the Developers option in the left menu, and then the API Keys option. If you do not have a test Publishable key or Secret key, create them now.
- The Publishable key will be stored in the
STRIPE_KEYenvironment variable - The Secret key will be stored in the
STRIPE_SECRETenvironment variable
We will configure the web hook value in the next section.
#Configuring Stripe and Spark: Web Hooks
Do not share your own API key values on the Internet like this. These are just example values!
In a previous step, we started a terminal window and shared our development site using Expose. Locate the Expose-URL (or equivalent) now so we can use it to configure our Stripe web hooks. The Spark documentation for configuration Stripe web-hooks can be located at https://spark.laravel.com/docs/1.x/spark-stripe/configuration.html#stripe-webhooks. The web-hooks we will configure are:
- customer.deleted
- customer.subscription.created
- customer.subscription.deleted
- customer.subscription.updated
- customer.updated
- invoice.payment_action_required
- invoice.payment_succeeded
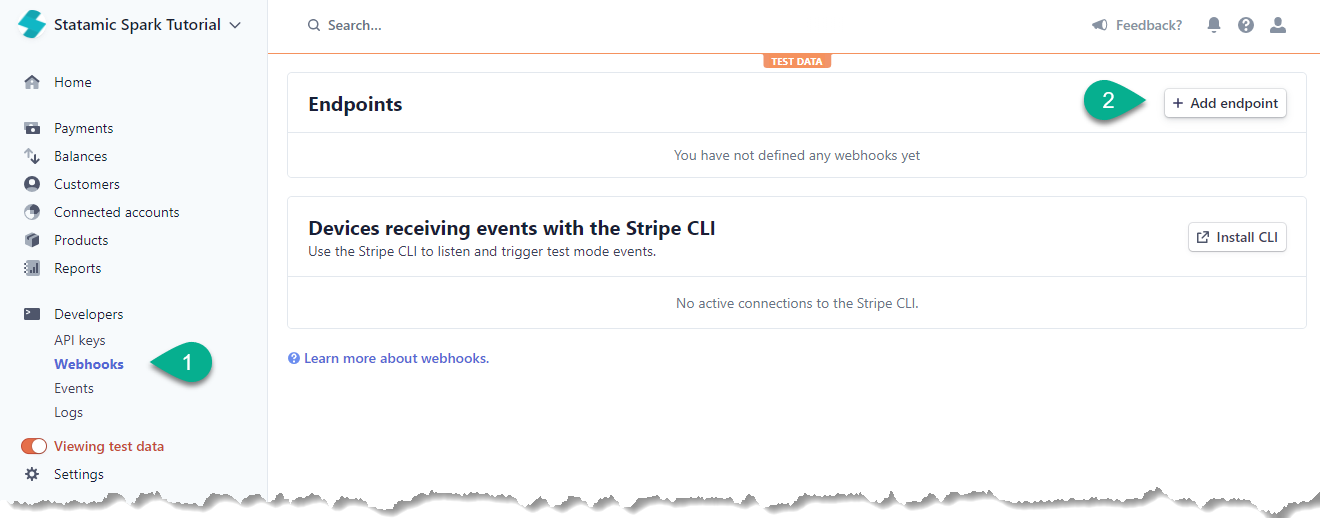
From the Stripe dashboard, select the "Developers" option from the left menu, and then the "Webhooks" (labeled 1 in the image below) item. On the page that appears, click the "Add endpoint" button (labeled 2 in the image below), located in the upper-right corner of the page:
On the modal that appears, enter your Expose URL followed by /spark/webhook in the Endpoint URL field, and then select the seven web-hook events listed above. Your screen should look similar to this once complete (you may have to scroll to view all configured events - this panel was manually increased in size for this screenshot):
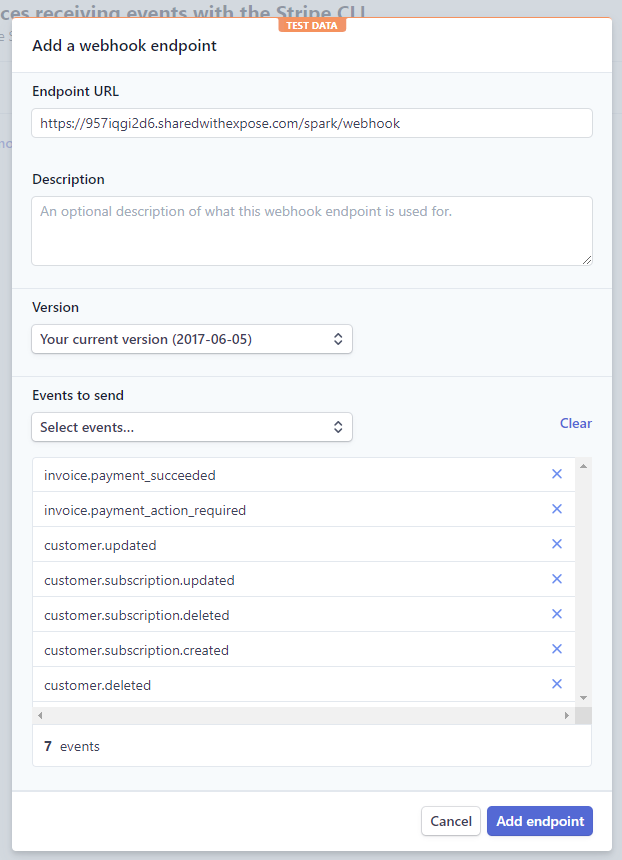
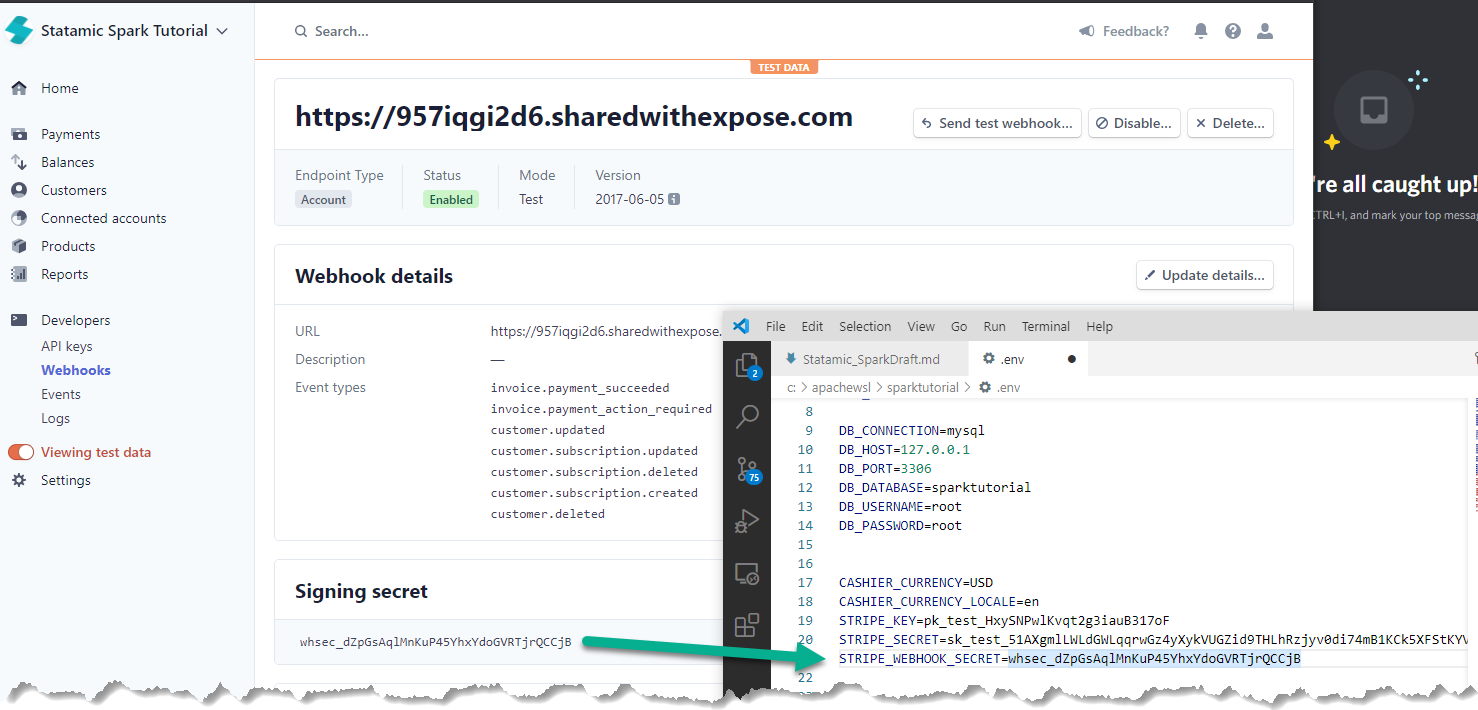
Once the URL has been entered, and the appropriate events have been configured, click "Add endpoint" to return to Stripe's Webhooks dashboard. You should now see your newly created web-hook, as well as an additional Signing secret section.
Click the "Click to reveal" button on the signing secret. This value will then be stored in the STRIPE_WEBHOOK_SECRET environment variable:
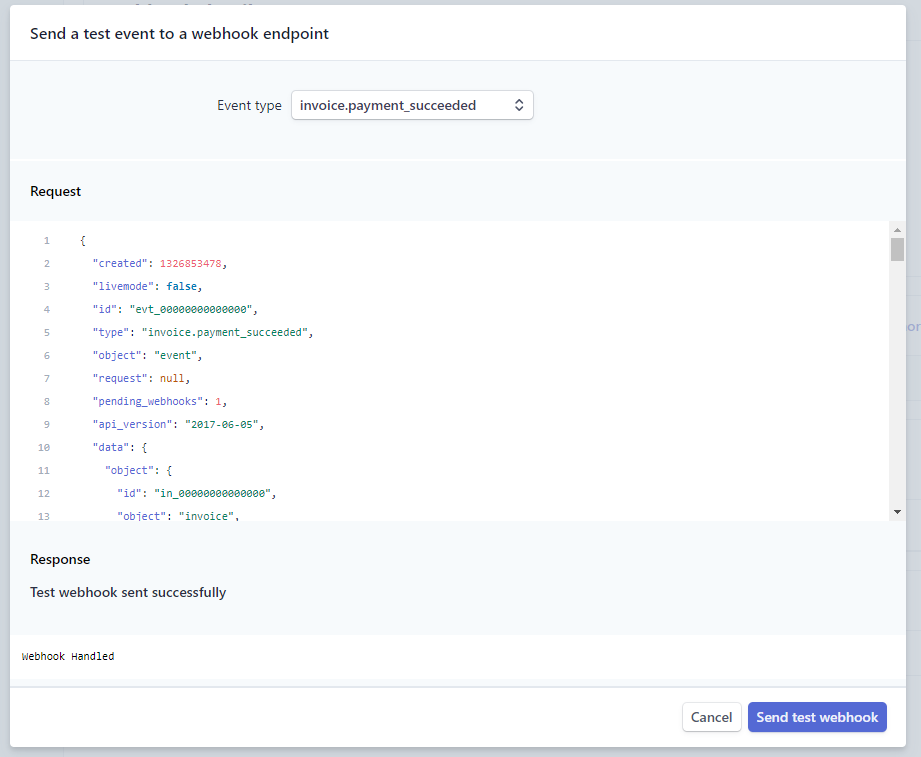
You may now click the "Send test webhook" button in the upper-right corner of the page. On the modal that appears click "Send test webhook". You should receive output similar to the following:
If you receive an error stating that no valid signature could be found, ensure that you have copied the correct web-hook signing key into your project's STRIPE_WEBHOOK_SECRET environment variable.
If you receive a page expired error, ensure that the URL you entered for the web-hook ends with /spark/webhook.
If you receive a 404 error, ensure that your development site is publicly accessible using a utility like Expose.
#Configuring Stripe and Spark: Product IDs
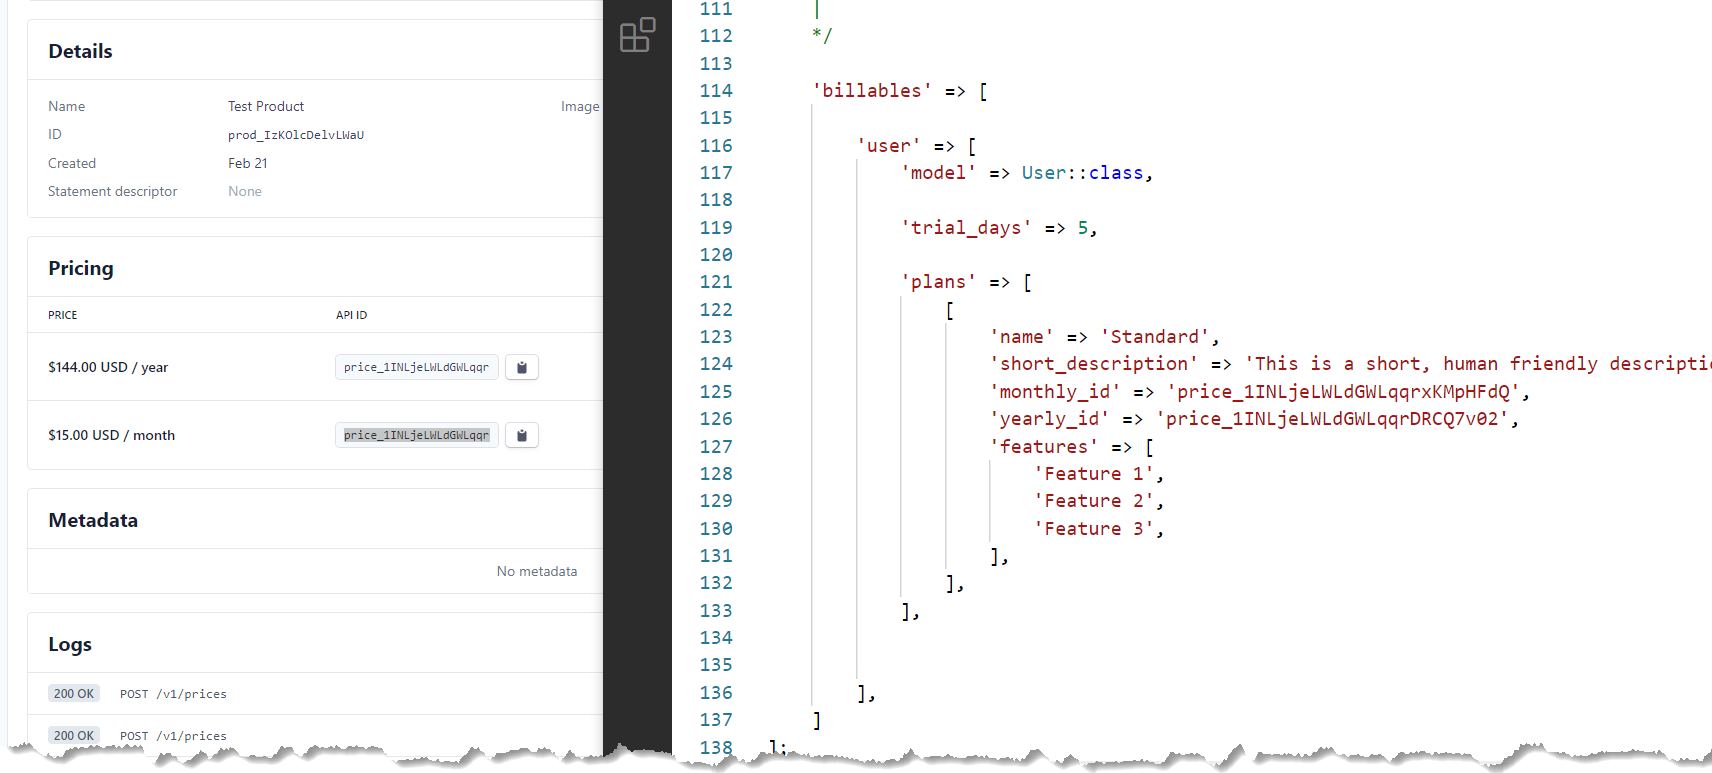
In this section we update our Stripe configuration to refer to the products we created within the Stripe dashboard in a previous step. Within the Stripe dashboard, select the "Products" option in the left menu, and then locate the product you created earlier. On the page that appears you should see the product's details, as well as the two pricing options we created earlier.
The pricing table should contain a few columns:
- Price
- API ID
- Subscriptions
- Created
It is the API ID that we will use to update our Spark configuration file. Locate the config/spark.php configuration file. Towards the bottom of the page, you should see a billables section. The default Spark configuration file contains a default entry for a Standard plan. Let's use the API ID values from the Stripe dashboard to update our Spark configuration:
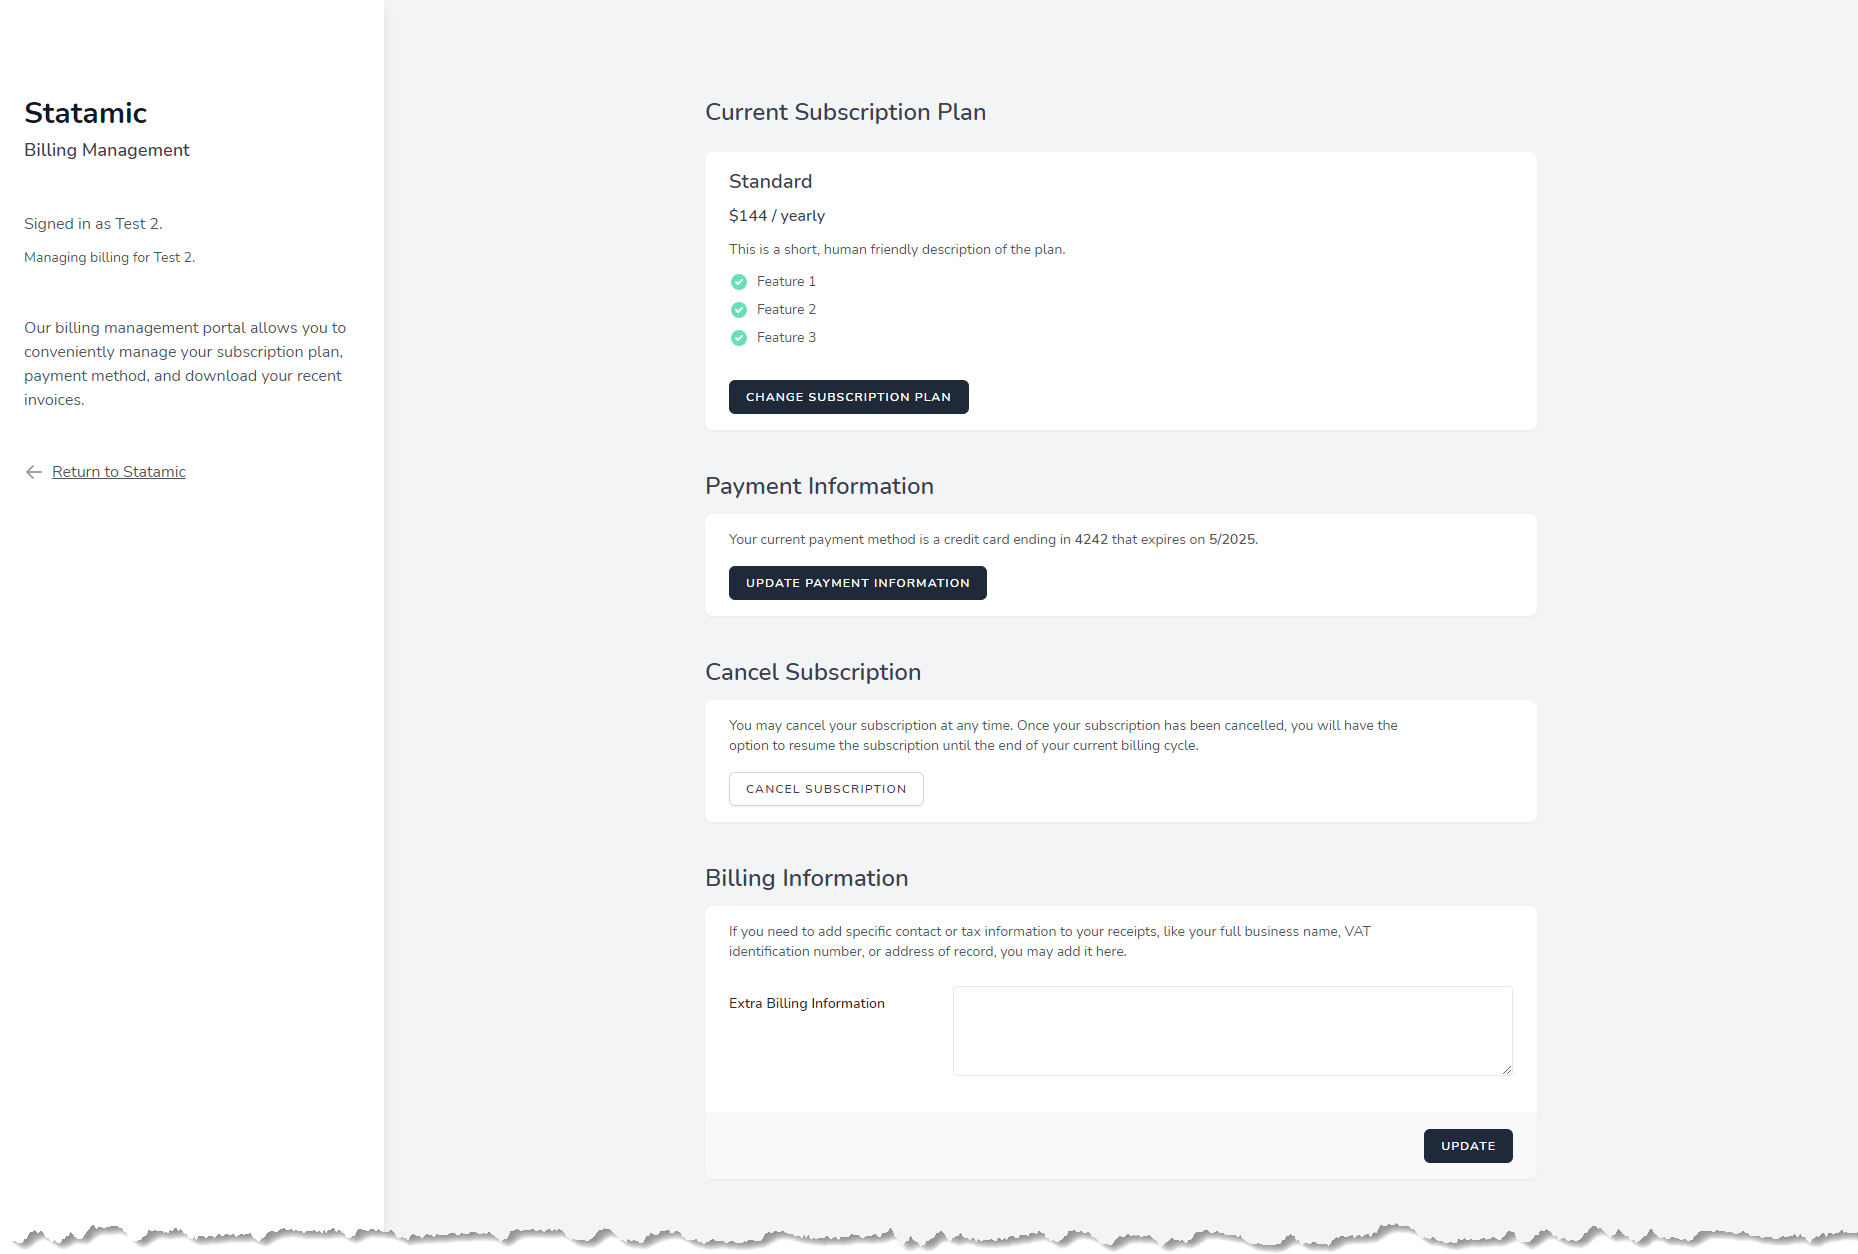
After these changes, returning to the Spark billing panel (with an authenticated site user) should now show our configured product details:
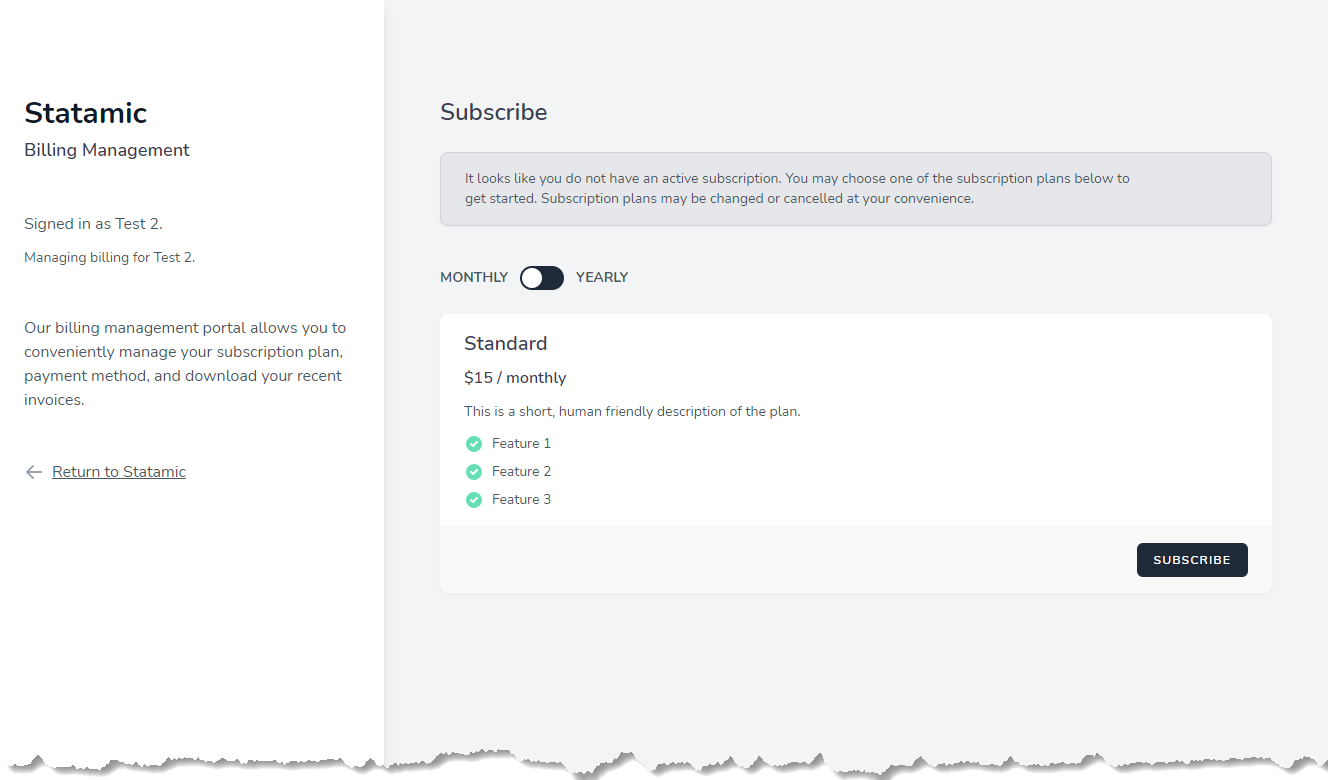
You can test your site's integration by using one of Stripe's Test Card Numbers. Go ahead and create a test subscription for a user (we will need at least one test user with a subscription in the next section):
In the next few sections, we will return to the Statamic side of things and create some custom Antlers tags that we can use to restrict access to site content.
#Restricting Access: Creating an Antlers Tag
In this section, we will create a new Antlers tag that will check if the currently authenticated user (if there is one) has an active billing subscription. We can then use this tag in our site's template to restrict access to our content. From the root of your project issue the following command:
1php please make:tag SparkYou should receive output similar to the following:
1john@computer:/sparktutorial$ php please make:tag Spark2Tag created successfully.3Your tag class awaits at: app/Tags/Spark.phpYou may now locate the app/Tags/Spark.php file and change the contents to:
1<?php 2 3namespace App\Tags; 4 5use Statamic\Facades\User; 6use Statamic\Tags\Tags; 7 8class Spark extends Tags 9{10 11 public function subscribed()12 {13 /** @var \Statamic\Auth\Eloquent\User $user */14 $user = User::current();15 16 if ($user === null) {17 return false;18 }19 20 // Makes it so that super users always have access.21 if ($user->isSuper()) {22 return true;23 }24 25 // Any additional exclusions can go here.26 27 /** @var \App\Models\User $userModel */28 $userModel = $user->model();29 30 if ($userModel === null) {31 return false;32 }33 34 if ($userModel->subscribed()) {35 return true;36 }37 38 return false;39 }40 41}This new tag will return a boolean value indicating if the current user has an active billing subscription. The rules are:
- Anonymous users (not signed in) do not have a subscription
- Statamic Super Users always have a subscription
- Non-super users who have a valid subscription
If you were curious, the subscribed helper method comes from Laravel Cashier, which Laravel Spark is built on top of. Let's update our Statamic Antlers template to use this new tag. Locate the resources/views/articles/show.antlers.html template and update the contents to:
1{{ if {spark:subscribed} }} 2<div class="max-w-5xl mx-auto relative mt-16 content"> 3 {{ svg src="/assets/site/scratches" class="absolute text-gray-800 mt-8 top-0 left-0 w-20 hidden md:block" }} 4 <article class="lg:py-32 max-w-2xl mx-auto"> 5 <h1>{{ title }}</h1> 6 <div class="bg-gray-800 inline-block text-sm mb-16 pr-4 pl-16 -ml-16 uppercase tracking-widest text-white py-1 rounded-r-full"> 7 Published 8 {{ if topics }} 9 in {{ topics }}<a href="{{ url }}" class="text-teal-light no-underline hover:text-white">{{ title }}</a>{{ unless last }}, {{ /unless }}{{ /topics }}10 {{ /if }}11 on {{ date format="M j, Y" }}12 </div>13 <div class="content">14 {{ content | widont }}15 </div>16 </article>17</div>18{{ else }}19<h2>Sorry, you do not have access to this content.</h2>20{{ /if }}After this change, users who are not signed in (or who do not have a valid subscription) will now see this instead:
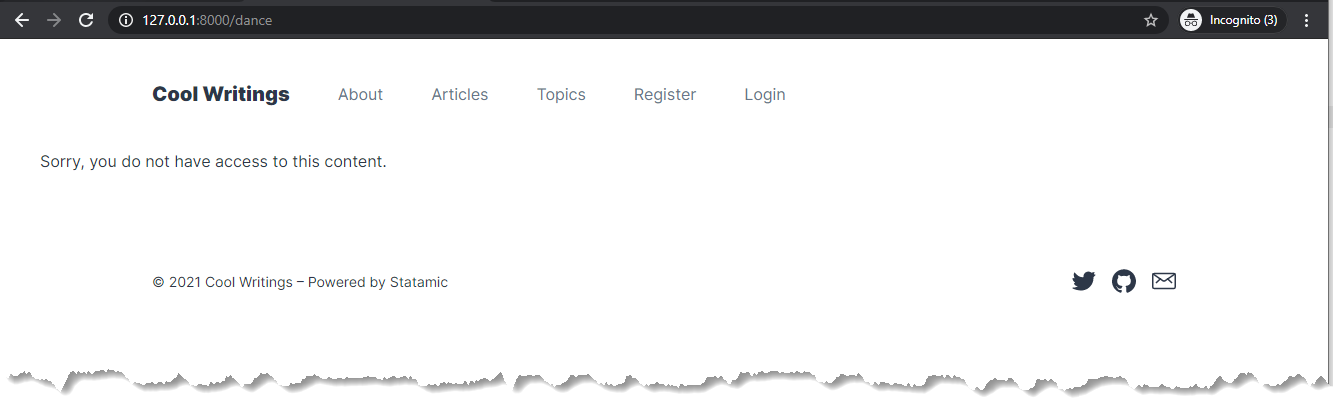
However, super users, or those customers with an active billing subscription will see the content:

#Selectively Locking Content Behind a Paywall
In the previous section we implemented a custom Antlers tag that can be used to block access to content entirely if the current user does not have an active billing subscription. It works, but does not make things easy if we want to have a mix of free content and premium content. This is the challenge we will tackle in this section.
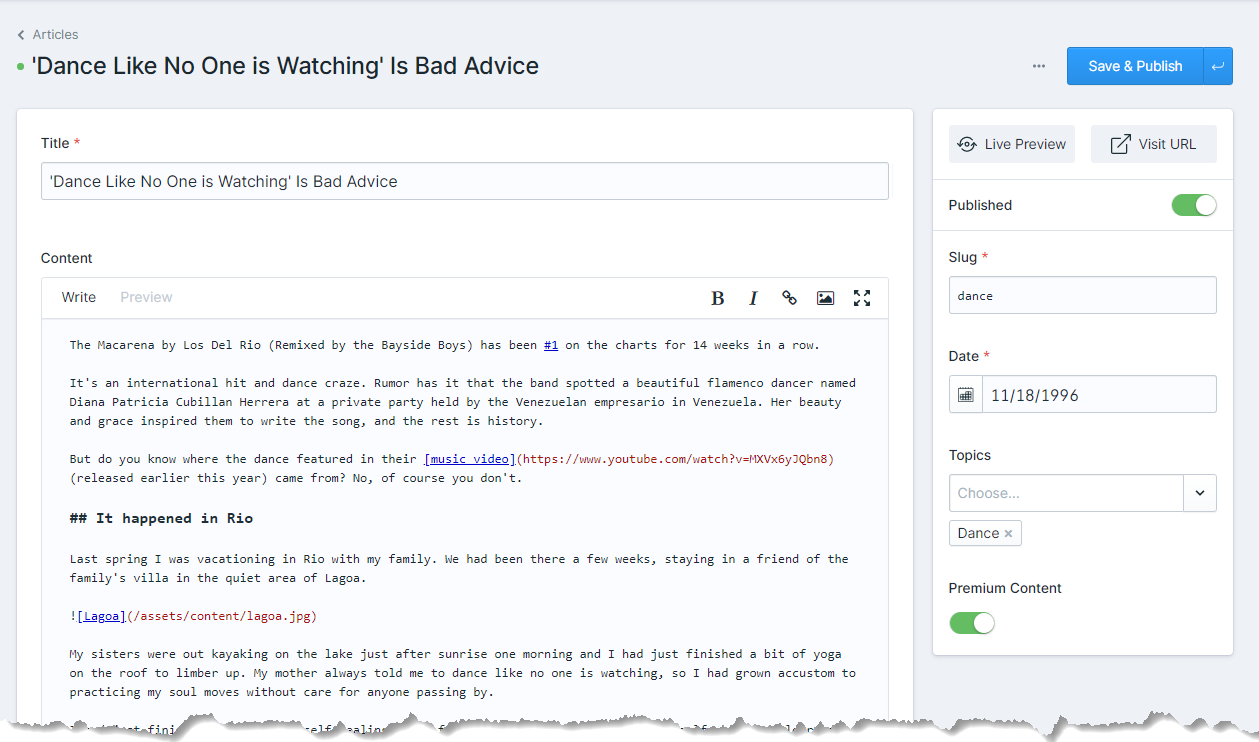
From the Statamic Control Panel, locate the "Blueprints" option in the left menu. On the page that appears, select the "Articles" entry within the "COLLECTIONS" category. On the page that appears, click the "Create Field" within the Sidebar section.
On the panel that appears, select "Toggle" as the field type. Use the following values:
- Display:
Premium Content - Handle:
premium_content
The exact handle value of premium_content will be important in the next step.
Once you have entered the values, click Finish to close the field panel, and then click Save to update the Articles blueprint.
Now, let's go view the Articles collection entries and change of of the existing entries to have this toggle set to true. I have used the "'Dance Like no One Is Watching' Is Bad Advice" entry for this tutorial:
To make use of this, we will create a new Antlers tag within our existing Spark tag class. Locate the app/Tags/Spark.php and change the contents to this to add a new canAccess method:
1<?php 2 3namespace App\Tags; 4 5use Statamic\Facades\User; 6use Statamic\Tags\Context; 7use Statamic\Tags\Tags; 8 9class Spark extends Tags10{11 12 public function subscribed()13 {14 /** @var \Statamic\Auth\Eloquent\User $user */15 $user = User::current();16 17 if ($user === null) {18 return false;19 }20 21 // Makes it so that super users always have access.22 if ($user->isSuper()) {23 return true;24 }25 26 // Any additional exclusions can go here.27 28 /** @var \App\Models\User $userModel */29 $userModel = $user->model();30 31 if ($userModel === null) {32 return false;33 }34 35 if ($userModel->subscribed()) {36 return true;37 }38 39 return false;40 }41 42 public function canAccess()43 {44 /** @var Context $context */45 $context = $this->context;46 47 if ($context->get('premium_content', false)->value() === false) {48 return true;49 }50 51 return $this->subscribed();52 }53 54}This new tag will look at the current context and checks if it has a premium_content field. If it does, and this field is set to true, our previous behavior of checking if the current user has an active billing subscription is used.
Locate the resources/views/articles/show.antlers.html file and update the contents to this:
1{{ if {spark:can-access} }} 2<div class="max-w-5xl mx-auto relative mt-16 content"> 3 {{ svg src="/assets/site/scratches" class="absolute text-gray-800 mt-8 top-0 left-0 w-20 hidden md:block" }} 4 <article class="lg:py-32 max-w-2xl mx-auto"> 5 <h1>{{ title }}</h1> 6 <div class="bg-gray-800 inline-block text-sm mb-16 pr-4 pl-16 -ml-16 uppercase tracking-widest text-white py-1 rounded-r-full"> 7 Published 8 {{ if topics }} 9 in {{ topics }}<a href="{{ url }}" class="text-teal-light no-underline hover:text-white">{{ title }}</a>{{ unless last }}, {{ /unless }}{{ /topics }}10 {{ /if }}11 on {{ date format="M j, Y" }}12 </div>13 <div class="content">14 {{ content | widont }}15 </div>16 </article>17</div>18{{ else }}19<h2>Sorry, you do not have access to this content.</h2>20{{ /if }}This change swaps out the spark:subscribed tag for the spark:can-access tag. With this change, only those entries that have the Premium Content toggle set to true will restrict visitor access. All other entries that do not have this field, or have it set to false will now be accessible to non-authenticated users, or those users who do not have an active billing subscription.
#Conclusion
The latest generation of Laravel Spark and the incredible flexibility of Statamic 3 make it incredibly easy to combine the two of them together. Throughout this article we created a new Statamic site based on the Cool Writings Statamic Starter Kit, installed Laravel Spark, configured a new product in the Stripe dashboard, and then created a few custom Antlers tags to assist with managing access to our premium content.
∎